
The best place to store winter tires is a cool, dry, dark spot away from direct sunlight, ozone-producing equipment, and swings in temperature — a climate-controlled garage corner, a dry basement, or a storage unit that doesn’t bake in summer heat. Where you put them matters almost as much as how you put them there, because rubber compounds degrade based on heat, UV exposure, and humidity long before tread depth ever becomes the issue. This guide walks through every viable storage location, how to store tires mounted or unmounted, positioning them correctly, and the prep steps that actually extend their usable life.
Why Proper Off-Season Storage Matters
Tires are made of rubber compounds, steel belts, and fabric plies bonded together with chemical additives that resist cracking, oxidation, and UV breakdown. Those additives work continuously, even when a tire isn’t touching the road. Heat accelerates the chemical reactions that dry out rubber, while UV light breaks down the surface and causes visible cracking. Ozone — produced by electric motors, generators, and even some fluorescent lighting — attacks rubber at a molecular level and creates fine surface cracks called ozone checking.
Six months of bad storage can do more damage than a full season of driving. A tire left in direct sun on hot asphalt can lose flexibility and develop sidewall cracking within a year or two, while the same tire stored properly might still look and perform like new after five years. Since winter tires already have a shorter annual usage window than all-seasons, poor storage habits compound quickly — you’re paying full price for a tire but only getting a fraction of its potential lifespan. If you’ve ever wondered why winter tires don’t work once temperatures rise, the same soft, temperature-sensitive compound that grips ice is also more vulnerable to heat damage in storage, which makes correct off-season handling even more important.
Best Locations: Garage, Basement, Shed, Storage Unit
Not every space you have available is equally suited to tire storage. Here’s how the common options stack up.
Garage
An attached or detached garage is usually the most convenient option, and it works well as long as it isn’t a heat trap. A garage that stays reasonably cool in summer and doesn’t drop far below freezing in winter is ideal. Keep tires away from the garage door’s western or southern exposure if sunlight streams in during parts of the day, and never store them next to a running furnace, water heater, or any motor that could generate ozone.
Basement
Basements are often the best indoor option because they stay naturally cool and are shielded from sunlight. The one risk is humidity — unfinished basements can be damp, and prolonged moisture exposure promotes mold on tread rubber and rust on exposed steel wheels. A dehumidifier or a simple moisture meter can confirm whether your basement is dry enough (aim for under 50% relative humidity).
Shed
A detached shed is workable only if it’s insulated or shaded. Uninsulated metal sheds turn into ovens in summer, which is one of the worst environments for stored rubber. If a shed is your only option, store tires in the shadiest corner, off the ground, and consider adding reflective insulation to the roof.
Storage Unit
Climate-controlled storage units are excellent if you’re short on space at home, but standard drive-up units without climate control offer little advantage over an average garage and often cost more. Pay the premium for climate control if you’re storing tires for more than one season or living somewhere with extreme summer heat.
| Location | Temperature Stability | Humidity Risk | Cost |
|---|---|---|---|
| Attached Garage | Moderate | Low-Moderate | Free |
| Basement | High | Moderate (needs monitoring) | Free |
| Uninsulated Shed | Low | Moderate | Free |
| Climate-Controlled Storage Unit | High | Low | Paid |
Mounted vs Unmounted Storage Tips
How you store tires depends heavily on whether they’re still mounted on wheels.
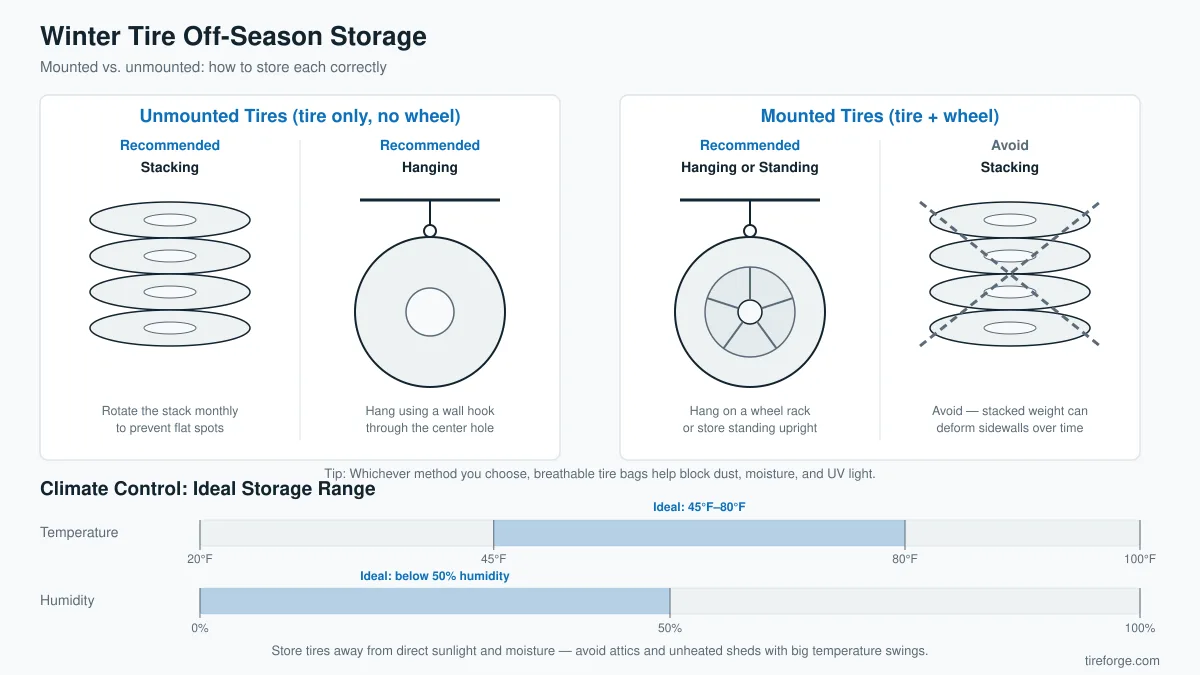
Mounted tires (on rims): These should be stored either stacked flat or hung vertically. Because the wheel and tire together are heavier and the tire holds its shape better with the rim’s support, stacking flat is generally safe for shorter off-seasons. Inflate mounted tires to about 3-5 PSI above their normal recommended pressure before storage, since tires lose a small amount of air naturally over months of sitting, and starting slightly higher helps them hold shape better and prevents sidewall flat-spotting.
Unmounted tires (no wheel): Without a rim’s rigid support, these should always be stored standing upright in a row, similar to how they’re displayed in a tire shop, or hung from a sturdy rack. Stacking unmounted tires flat for extended periods can cause the sidewalls to deform under the weight of tires above them, creating a lasting flat spot or oval shape that never fully corrects itself once remounted. Also inspect valve stems on mounted sets before storage; if a stem looks brittle or damaged, this is a good time to consult a guide on removing a faulty valve core and replacing it before next season.
Stacking, Hanging, or Bagging Tires
Each storage method has tradeoffs worth understanding before you commit floor space to it.
Stacking
Stacking is the most space-efficient method for mounted tires and is fine for four to six months if done correctly — on a flat, dry surface, not directly on concrete (use a pallet or plywood barrier), and not more than four or five tires high. For a full walkthrough of the do’s and don’ts, see this detailed guide on how to stack tires properly.
Hanging
Hanging tires from ceiling-mounted hooks or a wall rack keeps them off the ground, improves airflow, and works well for both mounted and unmounted tires. It’s the preferred method for long-term or multi-year storage since it avoids any sustained pressure point that could deform the tire.
Bagging
Sealing each tire in a dedicated tire storage bag (heavy-duty plastic, sometimes with a resealable opening) blocks UV light, limits oxygen exposure that speeds oxidation, and keeps out dust and pests. Push excess air out of the bag before sealing to minimize trapped moisture. Bagging is optional but genuinely worthwhile if you’re storing in a garage or shed where humidity or sun exposure isn’t perfectly controlled.
Climate Control: Temperature & Humidity Guidelines
Aim to store tires in a space that stays roughly between 45°F and 80°F year-round. Extreme cold isn’t as damaging to rubber as extreme heat, but repeated freeze-thaw cycles combined with moisture can still stress the compound over time. The real enemy is sustained heat above 90°F, which accelerates the breakdown of the antioxidant and antiozonant additives built into the rubber.
Humidity should stay below roughly 50-60% relative humidity. High humidity promotes mold growth on tread rubber and accelerates corrosion on steel wheels or exposed belts. A basic hygrometer costs very little and takes the guesswork out of monitoring a garage or storage unit. If humidity is consistently high, a small dehumidifier or moisture-absorbing packets placed near the tires can make a meaningful difference over a six-month storage period.
Avoid storing tires near anything that generates heat or ozone — furnaces, water heaters, electric motors, sump pumps, and even some LED or fluorescent lighting fixtures. Keep at least a few feet of clearance between tires and these sources whenever possible.
Common Storage Mistakes That Damage Tires
Most premature tire degradation during storage traces back to a handful of repeatable mistakes.
- Storing in direct sunlight: UV rays break down rubber’s surface and cause visible cracking far faster than age alone would.
- Leaving tires in contact with petroleum products: Oil, gasoline, or solvent residue on a garage floor can chemically attack rubber compounds on contact.
- Stacking unmounted tires flat for months: This causes sidewall deformation that can be difficult or impossible to fully correct later.
- Ignoring wheel condition: Storing tires still mounted on wheels that already have curb damage or minor bends means you’re not addressing the problem before next season; check out this guide on straightening a bent rim if a wheel needs attention before it goes into storage.
- Skipping pressure checks: Storing tires severely underinflated encourages sidewall creasing and uneven aging.
- Using airtight bags without removing moisture first: Sealing a wet or damp tire traps moisture inside the bag and encourages mold rather than preventing it.
- Forgetting to label sets: Not marking which corner each tire came from (LF, RF, LR, RR) means losing valuable rotation and wear-pattern data for next season.
Prepping Tires Before Storage
A few minutes of prep before tires go into storage pays off significantly when you pull them back out.
Start by washing each tire with mild soap and water to remove brake dust, road salt, and grime — leftover residue can degrade rubber slowly over months of storage. Avoid petroleum-based tire shines or dressings before long-term storage, since some formulas contain solvents that can dry out rubber over time rather than protect it.
Inspect each tire closely for nails, embedded debris, or punctures before storing; it’s much easier to address a slow leak now than to discover it in the fall. If you’re unsure whether something is lodged in the tread, this guide on identifying a nail in your tire covers the signs to look for. Check tread depth and overall condition, and if a tire is nearing the end of its useful tread life, it may be worth checking your tire warranty coverage before committing to another season on it.
Set tire pressure slightly above the recommended PSI listed on your doorjamb sticker, since tires naturally lose a small amount of air over several months of inactivity. Label each tire’s position if they came off the vehicle as a set, using tape or chalk on the inner sidewall, so reinstallation next season is straightforward and rotation history isn’t lost. Finally, place tires in their storage spot immediately after prep rather than leaving them in a garage doorway or driveway, where sun and weather exposure can undo the benefit of everything you just did.
Frequently Asked Questions
Can I store winter tires outside covered by a tarp?
It’s not ideal. Tarps trap heat and moisture underneath, especially in direct sun, which can promote both UV-driven cracking on exposed edges and moisture-related mold on covered surfaces. Outdoor tarp storage should be a last resort, not a primary plan.
How long can winter tires sit in storage before they degrade noticeably?
With proper cool, dry, dark conditions, tires can be stored for several years with minimal degradation. Most tire manufacturers consider tires usable up to about six years from the manufacture date regardless of storage conditions, so storage extends usable life within that window rather than beyond it.
Should I store winter tires mounted on wheels or take them off?
Either works, but mounted storage is more convenient for swapping seasonally and slightly more forgiving if stacked flat for a few months. Unmounted tires take up less vertical space but require upright or hanging storage to avoid sidewall deformation.
Does a vacuum-sealed bag help preserve tires better than a regular one?
Not necessarily. What matters most is blocking UV light and limiting excess oxygen and moisture exposure — a standard heavy-duty tire storage bag with air pushed out achieves this without the complexity of true vacuum sealing.