

When you think of the headlights in your vehicle, you rarely consider the retaining clip.
That’s because it’s one of the least-talked-about parts. However, that doesn’t make it inferior to others.
Far from this, it serves an integral function of holding the light-emitting bulb in place.
If the retaining clips were to break or go missing, you wouldn’t be able to use the headlights at all.
Thankfully, these retainers are easy to buy and replace.
So in this post, I’ll provide a step-by-step guide on how to install a headlight retaining clip.
What Is the Part That Holds the Headlight Called?
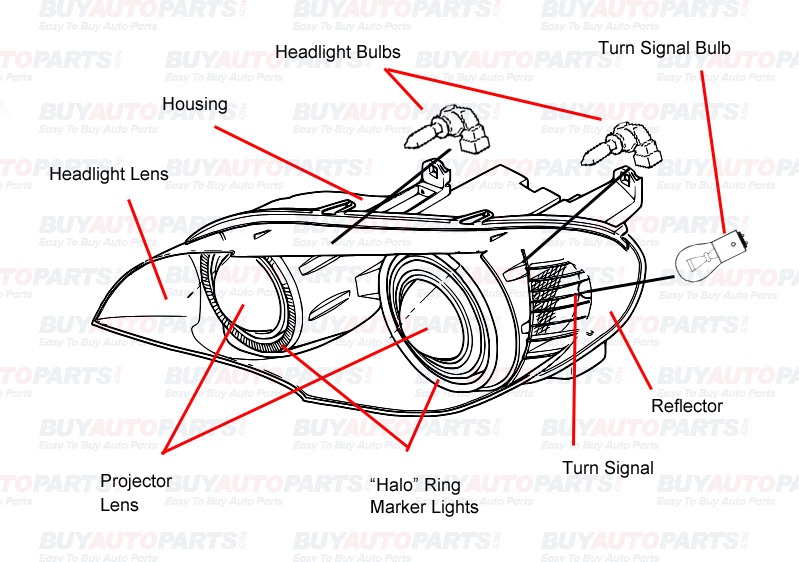
The car’s headlight and the different parts that support its function, make up what is known as the headlight assembly.
As you’ll learn below, the main part of this assembly is the headlight bulb, and it’s held securely in place by a retainer or retaining clip.
The retaining clip has two main components: a plastic clip and a metal clip.
The plastic clip is connected to the headlight housing while the metal one connects to the vehicle’s chassis.
If the retaining clip malfunctions, there’ll be nothing to hold the bulb in place. This means that it can come loose and fall off.
Although the focus of this article is on headlight retaining clips, it helps to familiarize yourself with other parts of the headlight assembly.
Each of these elements plays an important role(s), enabling the headlight system to work correctly.
Here’s a brief introduction to the headlight’s anatomy:
Bulb
This is the main component in any headlight system of a car. It’s the part that emits light, allowing you to see what’s ahead.
Headlight housing
Also known as the headlight cover, the housing serves a number of functions. For one, it’s the part that holds all the headlight components.
It also attaches the headlight to the body of the vehicle. But most importantly, the housing protects the interior parts from external factors, such as moisture, humidity, and excess heat.
Reflector
The reflector is responsible for capturing as much of the light emitted by the headlamp and then directing it to the road.
Headlight lens
If you look at your car’s headlights keenly, you’ll notice that a portion of it is made of plastic.
This is known as the lens and it’s the part that brings to focus, scatters, and deflects the beam of light collected from the reflector.
Unfortunately, I couldn’t find any videos showcasing these parts, but this image gives you a pretty good idea of the different parts.
How to Remove and Install a Headlight Retaining Clip
Given the minute size of the headlight retaining clips, you might be feeling slightly intimidated when it comes to removing and installing them.
However, this process is pretty simple so you have nothing to worry about. Follow these steps and you’ll have a brand new headlight retaining clip in no time:
Step 1: Gather necessary tools
Start by gathering all the tools you’ll need for this process. Ensure you have a screwdriver, socket, ratchet, safety glasses, and gloves.
Step 2: Removing the top cover and fender
The first thing you need to do is to remove the radiator support cover if your car has one. You can do this by unscrewing the nuts and holding the cover in place.
Once you’ve removed the cover, the next step is to detach the bumper. Again, this involves unfastening the nuts and bolts used to secure it.
By the time you’re done, you’ll notice that the bumper pulls away very easily.
Step 3: Disconnect the fog lights
Before you remove the bumper completely, remember to detach the cable connecting the fog lights to the bumper.
Next, set the bumper aside so you have easy access to the headlight.
Step 4: Remove the headlight cover
This next step requires you to detach the housing of the headlight. Start by unfastening the bolts used to secure this lighting fixture.
Next, disconnect the coolant reservoir hose and detach the housing by pulling it forward.
Step 5: Replace the headlight retaining clip
The final step entails removing the old clip and replacing it with the new one.
When performing this change, check how the clip is oriented. Not paying attention to such trivial details could mean the difference between your headlight working or not.
Step 6: Reassembling and testing
With the new retaining clip securely in place, the only thing left now is to reassemble the headlight and test its performance.
If you followed the installation procedure to a tee, your headlights should illuminate as usual.
Why Do Headlight Retaining Clips Fail?
The main reason why headlight retaining clips fail is because of coming into contact with moisture.
Once this happens, the metal clip gradually starts to rust; hence, losing its efficiency to hold the bulb in position.
Thankfully, this problem doesn’t call for a costly repair. Headlight retaining clips are readily available, and this brings me to my next point.
Where Can You Find Them?
The best place to start your search for your car’s retaining clip is in your nearest auto parts shop. Here, you’ll get advice on how to choose a clip(s) that suits your car model.
But if you already know the exact replacement that you need, then look for it on retail websites like Amazon and Walmart.
Most headlight manufacturers sell headlight spare parts on these platforms, giving you a variety of options to pick from.
Does One Size Fit All?
No, it does not. If you’re planning to purchase retaining clips, you should know that they don’t come in a universal design or size.
They vary widely depending on the type of vehicle headlights and the manufacturer.
Retainer Ring clip vs Spring Clip – What’s the Difference?
If you’ve scoured the web for a retaining clip, you may have noticed that there are two types: ring and spring.
The ring retaining clip gets its name from the slightly round shape that it comes in. This clip can be bent into different shapes so as to fit the intended application.
The spring-clip differs in that it uses a spring-loaded mechanism.
This makes it much easier to install and it’s also compatible with a variety of headlight bulbs.
By now, you might be wondering which retainer clip to choose? This depends on the original type of clip installed in your headlights.
Put simply; you should look for an exact replacement to ensure your headlights work properly.
Conclusion
If your current headlight retaining clip is rusted or broken, you’ll want to change it immediately. You don’t want to risk your headlamp falling off and getting damaged.
Fortunately, learning how to install a headlight retaining clip isn’t that difficult.
Ensure you have the right tools, then follow the steps mentioned in this post.

 Tire Forge